Disclaimer
IMPORTANT UPDATE: In April 2003 I began using OpenZaurus instead of the stock Sharp ROM. These instructions may not apply to anyone not using Sharp's ROM image. I am now maintaining a separate page for OZ Software Tips.
These instructions worked for me. They were culled from various web pages, forums or irc channels. I use a stock Zaurus SL-5500 with the Sharp ROMs and Qtopia environment. I have a 128 MB SD card (currently formatted as default FAT). I connect my Zaurus to the internet through the cradle with TCP/IP over USB to a Windows XP laptop.
When appropriate I have included screen captures. These
will appear either as thumbnails that link to the full-size image, or
simply as an image link ![]() that serves the same purpose.
that serves the same purpose.
Jump Points (newer at bottom)
- Useful replacement applications
- Useful shell scripts
- Enable VNC server for remote control of Zaurus
- VNC client (keypebble) for remote control of other computers
- Enable SSH for a larger, secure termial window
- Use FTP to upload/download files
- Alternate input methods
- Reorganize your tabs and applications
- Enable swap space for temporary memory increase
- Run Palm OS applications under emulation with QPose
- Run X11 applications remotely with qtopia-x
- Customize your startup/boot screen
- Assigning programs to your application keys
- Hide CS or SD card contents from Documents tab
- Some notes on getting the Z online via USB on Windows XP
- Run Mac software (System 8 and below)
| 1. Useful replacement applications | [top] |
While the base applications listed below perform fine, these drop-in replacements provide more features. Usually just installing the replacement moves the original file out of the way.
| Program | Provides |
| System Info | more details; unzip and copy to /home/QtPalmtop/bin/sysinfo |
| TextEdit | access to whole filesystem |
| File Manager | browse, move, edit files |
| Tab Manager | organize application icons |
| Calculator | NeoCal does it all |
| 2. Useful shell scripts | [top] |
If you're comfortable using the console, then these shell scripts that perform some frequently needed functions will save time and effort.
| Script | Provides |
| setswap.sh | use of swap space for extra memory |
| unsetswap.sh | removal of swap space when unneeded |
| route.sh | access to your network via the cradle |
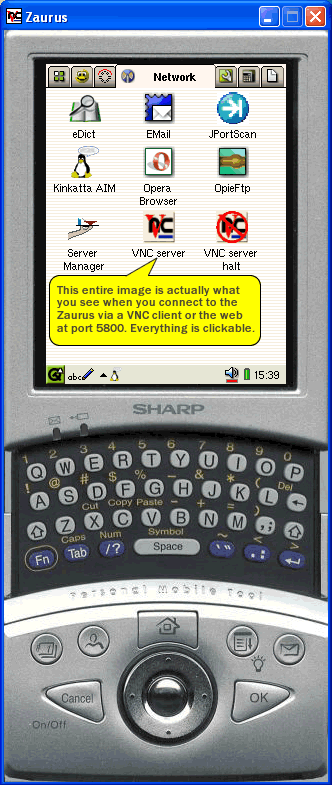
| 3. Enable VNC server for remote control of Zaurus | [top] |
(updated 2002-08-23)
By running a VNC (Virtual Network Computing,
developed by AT&T labs
in Cambridge) server on your Zaurus, you can connect to it with a
VNC client running on any other computer that can reach your Zaurus on
the network. This has the immediate benefit of being able to use your
full-sized keyboard and pointing device (mouse) to control and Zaurus
environment.
The fbvncserver is delivered as an .ipk so its easy to install. It will put several icons into your Applications tab. Three to launch various flavors of the server, and one to stop the server. The most useful is called "fancy" and it will appear to the client as a fully-extended Zaurus, with functioning keyboard and application buttons.
After you install VNC you should reboot and as soon as you have control, tap as closely as possible the top left corner and the bottom right corner of your screen. This establishes calibration for remote control purposes. This only works once unless you delete the file /etc/tssim_cal.conf and reboot again.
To use the client, download one appropriate for your platform from the link above. Then run the VNC Viewer and give it the IP address of your Zaurus followed by a :0 to specify display zero. There is no password by default. If all goes well, you should be in.
| 4. VNC client (keypebble) for remote control of other computers | [top] |
(updated 2002-07-16)
Suppose you want to use your Zaurus as the VNC client to control a Windows,
Linux or Mac that is running the VNC server? Besides the fact that you'll
be doing a lot of scrolling, this is certainly possible. You'll need to
download treke's modified keypebble,
the VNC client, and install it. This version defaults to 8-bit encoding
and remembers recent connections. An icon is added to your Application
tab. Start it up and enter the IP address, display (typically 0, sometimes
1) and your password. Recent servers are remembered in the drop-down menu.
If you want to change settings, close the connection and use the menu
in the lower-right corner of the screen. You can't change settings during
a session.
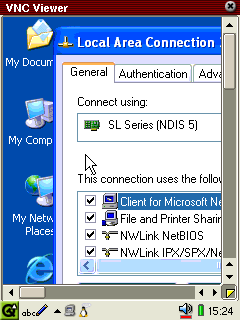

These are screen captures of connecting to a Windows XP, Mac OS X and Linux desktop, respectively.
While clicking can be accomplished with a 'tap', and dragging seems to work as expected, you might find that double-clicking is difficult to perform on the Zaurus screen. Some operating systems will accept an Enter key to activate an icon. Try using either the keyboard's Enter, or the OK button on your Zaurus.
| 5. Enable SSH for a larger, secure terminal window | [top] |
If you will be spending a lot of time in the terminal, or it what you want to display doesnt fit well on the Zaurus' screen, you might consider running an SSH daemon on your Zaurus to allow you to connect to from your deskto machine's full-size screen. You will need the following skills in order to install successfully: ability to follow directions carefully, basic knowledge of linux command line, a way to get a file onto your Zaurus (desktop sync, FTP, etc), the ability to download and install an ssh client for your desktop machine.
I recommend the following: putty for windows systems (all flavors), Nifty Telnet for Mac OS 9. If you're on Linux or Mac OS X you have built-in ssh clients already.
- Download the ssh package (its a tar.gz) and upload it to your Zaurus
- Follow the well-written instructions inside that package
- Remember to set a strong password
- When you access the shell from your Zaurus, the file .bashrc in your home directory is loaded with settings such as aliases and exported variables. You must either symlink this file to .profile or make a new file there in order to have settings load when you login via SSH.
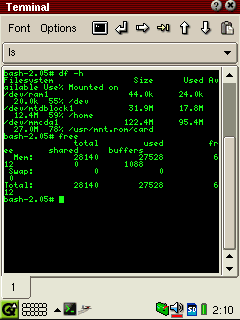
Typical task on the internal screen showing hard to read line wrappings.

Same tasks being performed, on the same Zaurus, thru a remote screen.
| 6. Use FTP to upload/download files | [top] |
The Zaurus is always (while Qtopia is running) listening on port 4242 for FTP traffic. By default, the login name is 'root' with no password. If you followed directions in step 5, above, you assigned a password to your root account. This same password will now be necessary to access your Zaurus' filesystem with an FTP client. There's nothing you have to install, its already there. Some notes:
- The location of files you normally move to your Zaurus via the desktop sync software is in /home/root/Documents.
- On a CF storage card, its in /mnt/cf/Documents
- On an SD storage cards its in /mnt/card/Documents
- Inside of each of these is a hierarchy of directories that breaks down the files by type (audio, image, text) and then further by mime type (plain, html)
| 7. Alternate input methods | [top] |
Handwriting (a letter at a time) is cute, but you may find yourself wanting more precise control over the characters you enter into your Zaurus. Several add-on input methods are available to assist with particular kinds of entry. Some are designed for specific programs, some are more general purpose.
Keyboard: Comes standard with the Zaurus. Uses the
US standard qwerty layout to maintain familiarity. The keys are small,
but usable. ![]()
jumpX: Popular because it manages to fit a lot more
keys into a smaller space than is required by the standard 'keyboard'
method -- and with larger buttons. The layout requires a bit of re-learning,
but the accessibility gained by having more keys available, and in a logical
order (FITALY), makes
it a winner. ![]()
Custom Keyboard: This add-on by Jesper Pedersen allows
you to quickly access your most frequently used special characters (including
Unicode) with a single tap on the character in a new input bar at the
bottom of your screen.
You can also create shortcuts that when typed onto the physical keyboard
are expanded into their full-text equivalents. ![]()
QPlot-Style Math: When you install QPlot (an advanced
math calculator by Nikandrov George) you get the added benefit of this
additional input method. While its most useful inside the QPlot program,
there may be other times when the shortcuts come in handy. ![]()
| 8. Reorganize your tabs and applications | [top] |
You have already downloaded Tab Manager (above), right? Launch the application
and you are presented with a hierarchical menu (explorer-style) of your
existing Zaurus tabs. Tap any tab to expand it, and see the programs that
are residing there.

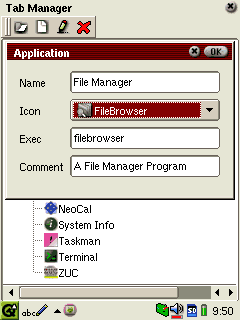
To move a program to a different tab, tap once on the program name, then tap on the tab name where you want it moved.
To create a new tab, tap the 'Folder' icon, name the tab and provide an icon for it. The tabs are displayed in Tab Manager, and on the Zaurus browser in alphabetical order.
To create a new program entry, click the 'Document' icon. An entry named 'New App' appears in the currently selected tab. Select it and tap the 'Pencil' icon to edit its attributes. (You can also use the pencil to edit tab attributes.) After icons are loaded, you can provide a Name, Executable path and Comment for the entry. When you close Tab Manager, the Qtopia environment must refresh, which takes a few seconds, before your changes will appear.
For the curious, this program simply modifies the collection of .document files residing in /home/QtPalmtop/apps/<tab name>/ which is what the browser uses to display icons and launch programs. A typical .desktop file looks like this:
[Desktop Entry]
Comment=A program for drawing
Exec=drawpad
Icon=drawpad/DrawPad
Type=Application
Name=DrawPad
There is a lot more that can go here, such as mime associations and language preferences. If you edit the .desktop files by hand, you must manually restart the Qtopia environment (Using the Shutdown program in the Settings tab) before your changes can be seen.
| 9. Enable swap space for temporary memory increase | [top] |
There may be times you want to run applications that require more memory than your Zaurus has available. Because its Linux, we can easily enable what is called 'swap space' on the storage area that acts as virtual memory for programs to use. You probably don't want to have the swap enabled continuously as that has the potential to slow down operation of your Zaurus.
I use two shell scripts that I run from Terminal when I want to enable or disable swap space in my storage RAM in order to temporarily provide more memory space for programs to run in. Notice that the path where I put my swap file is /home/root/SwapFile. You can change the name, but you shouldn't change the location. The block size (bs) is set as 1024, so as to measure in kilobytes. The count is the number of kilobytes to allocate for the swap, in this case 8192 which is an additional 8 MB which can be used by programs.
Some people leave their swap file intact between uses. I delete mine each time to free up that storage space, in case I need it.
setswap.sh
#/bin/sh
dd if=/dev/zero of=/home/root/SwapFile bs=1024 count=8192
mkswap /home/root/SwapFile
swapon /home/root/SwapFile
echo "8 MB swap active."
unsetswap.sh
#/bin/sh
swapoff /home/root/SwapFile
rm /home/root/SwapFile
echo "swap disabled."
To enable swap, enter this from the command prompt: ./setswap.sh and to disable it: ./unsetswap.sh
You can also download HRAbbey's ChangeSwap program, which has a friendlier user interface for enabling and disabling swap space.
| 10. Run Palm OS applications under emulation with QPose | [top] |
[View this instruction on its own page]
First a note on QPose and emulation in general. Because the Palm uses a different chipset than the Zaurus, there is a significant performance hit when running the Palm OS under emulation. In my experience with QPose, specifically, once you get the software loaded, and if you plan to stay within a single piece of software (not switching back to Home often) then the emulation mode is suitable for productive use of reference materials, or programs that don't require too much input. If you do switch between various programs, you'll see long delays each time you go back Home and then again when launching the application. That having been said, let's proceed to the guide.
Download the QPose packages from Climov's site and install both the -data and the -bin packages in that order. You'll then have an icon that looks like the blue one below in your Applications tab named 'Palm Emulator'. Next, download the PalmM100 ROM image from this site. You'll need to upload the ROM image file into ~/Documents/application/x-rom/.
| You may need to prepare your ROM image as described on this page to put it into little-endian format. I don't remember if I did this or not. http://www.cypherpunks.ca/zaurus/ |
You can at this time put any Palm applications into ~/Documents/application/x-prc/. Looking at your Documents tab you should see files that look like this representing Palm applications and Palm ROMs.
![]()
If you don't see these custom icons, make sure that the following entries
are in your /home/QtPalmtop/etc/mime.types file then restart Qtopia. You
should also manually add these to your Qtopia Desktop's mime.types file
located on your Windows machine at Qtopia Desktop\etc\mime.types in order
to ensure that uploaded files end up in the right place on your Zaurus.
application/x-pdb pdb
application/x-prc prc
application/x-pqa pqa
application/x-psf psf
application/x-rom rom ROM
The following steps will illustrate how to get your Palm emulator running the first time, and how to install your first application.
- Its probably a good idea to enable swap space for extra RAM. See the instructions for #9 directly above.
- Tap the program icon in the Applications tab to start it up (just
to make sure it runs). It takes a moment, but then you'll see this screen
prompting you to open a ROM file.

- So, do like it says and open the ROM file from your documents tab.
You will see this screen asking you to specify your emulator settings.
If you are using an 8MB swap file, you can run an 8MB Palm, but I've
found 4MB to work sufficiently for running/storing a few applications.
- Once you click OK on the settings window, the Palm OS loads. This
may take a while, but eventually you'll see the main window with the
pre-loaded applications.
- To load your own applications, switch back to the Documents tab and
open a Palm application file. You'll see a progress bar while it loads
into the emulator's RAM.
- After loading new programs, you may need to force a refresh of the
Palm's internal list by opening a small program (like calculator) then
going back to Home view before the new icon appears.
- When you are done using the Palm, just close it up. Your settings, including loaded applications and any data, is stored in a file at /home/QtPalmtop/share/qpose/posession.psf. You might want to make a backup of this file in order to restore your current state if anything should happen. The next time you start qpose by opening the application icon, you'll be brought back to the exact same state your Palm was in when you left -- and a bit quicker, too.
- You can disable the swap when you no longer need it.
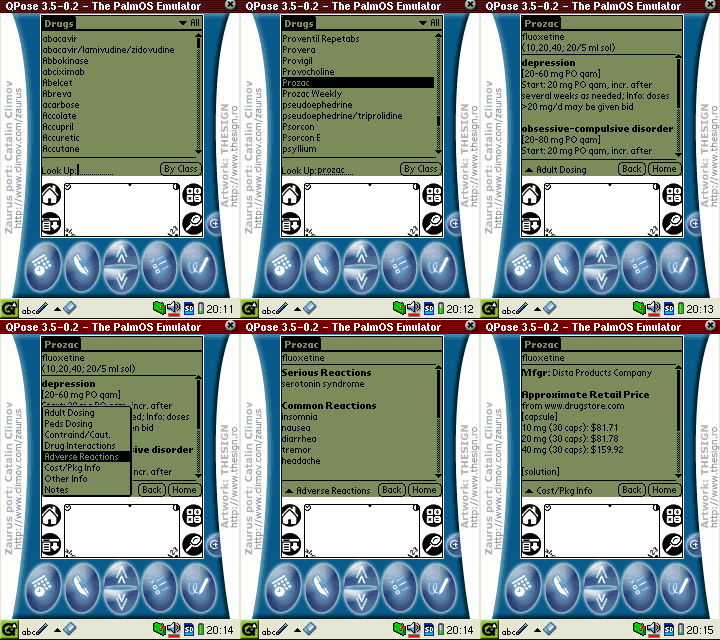
Just to prove that this works, I loaded a very large and complicated piece of software that is very popular on the Palm platform: The ePocrates medical database. It took about 35 minutes to load all the related files, but then I backed up my posession.psf file so I could restore it easily, anytime. Here are screenshots of ePocrates in action -- and the speed is quite usable.
| 11. Run X11 applications remotely with qtopia-x | [top] |
Once you understand how X11 works, then using qtopia-x to run applications remotely, but view them locally becomes easy. First, look at this diagram to understand what is actually happening when you are running an X server on your Zaurus and connecting to it from the command line.
(coming soon)
| 12. Customize your startup/boot screen | [top] |
Create a 24-bit image at 240x320. Rotate it 90-degrees clockwise. Save it as Startup_screen.bmp. Copy it to /opt/QtPalmtop/pics/
| 13. Assigning programs to your application keys | [top] |
The Application Key program in your Settings tab can be used to assign quick-launch actions to the four application keys on the front of your Zaurus. Typically, these are: Datebook, Contacts, Menu, Mail. If you want to assign them to launch other programs, make sure your programs reside in the Applications tab, as that is the only place scanned for items to place into the drop-down menus.
| 14. Hide CS or SD card contents from Documents tab | [top] |
[Thanks to XavierXeon
for this info]
F irst, change the /etc/mtab file from being a symlink to /proc/mounts
into being a regular file. Then edit the file and comment out those mounted
filesystems you don't want the Documents tab to scan.
To change mtab from a symlink to an editable file:
# cd /etc
# cp mtab mtab.old
# rm mtab
# mv mtab.old mtab
Then just edit mtab, comment out /dev/hda1 (CF card) /dev/mmcda1
(SD card) if you want to remove all files on those two sources completely.
Or just append /Documents to the end of each to only show files in the
Documents directory on each inside the Documents tab. NOTE: This might
break things like the ipkg manager.